Did you ever get the chance to configure a multi-select look up. Recently, one of our team members had to create a dropdown including the following features:
Customer-Specific Requirements:
Users should have the ability to select more than one item from the dropdown
- . An excess of 100 items are found in the dropdown
- A developed is not needed to add items to the system user
- A user should be efficient to search for options
- All the options should be sorted out alphabetically
Review the Requirements
The best solution is to lookup for a column where a user can select more than one record. Review the following requirements to see the options supported by the lookup column.
- Users should have the ability to select more than one item from the dropdown
You should know that standard lookup columns do not have the option of multi-select
- An excess of 100 items are found in the dropdown
Since there are many options available, your best option is to lookup.
- A developed is not needed to add items to the system user
You should not be dependent on the developed so for a user to access updating choices you need access to the PowerApps maker environment; so, you should have large lists managed through lookup reference tables.
- A user should be efficient to search for options
Search options are only available with lookup so it is your best approach
- All the options should be sorted out alphabetically
This area is where Choices (multi-select) do not perform well; you should know that once the list of options is created there is no going back. Lookups are only view-to-display; however, filtering is configurable. You may think that these features easy easily implemented using the standard choices (multi-select) column, however, some of these features are not possible and some are very difficult to manage. Some features require the user to have access to the PowerApps maker
Microsoft Dynamics 365 comes with-in a built-in feature that allows the system administrator to configure a multi-select look-up. The good news is that this setup is easy and does not require any coding system.
This blog provides a step-by-step guide to help you configure the look-up.
Steps to Configure Multi-select Lookup
Multiselect Lookup is shipped with Dynamics 365 Field service. Here, we will showcase how you can configure the multi-select lookup. This guide will also help you associate multiple accounts to a contact using a multi-select lookup.
- Firstly, login into the PowerApps Maker
- Then select the correct environment with Dynamics 365 installed
- Click Data on your navigation and select Tables
- Choose the Contact Table
- Next, you need to create a new column called Accounts. See the images below for details:

- Next, add the Accounts column to the Contact Main Form, then click on Save and
- The next step is to add Multi-select control to the form.
- Then, double-click the Accounts column and open the field properties and choose the controls tab

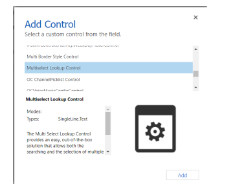
- Click on Add Control, scroll down and look for the Multiselect Lookup Control, select it and then click on Add

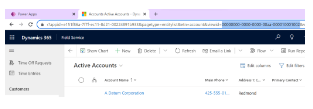
- You should know that for these steps you will need to get the view id for active accounts; you can achieve that using the option of a new session on PowerApps Maker

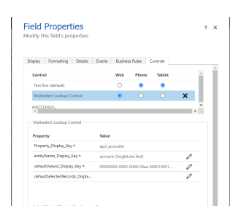
- The next step requires configuring the properties for the control. By default, the Property_Display_Key should already be populated. Click on the pencil icon next to entityName_Display_Key, select Bind to Static Value, and then set the Text property to account (all lowercase). Next, set the viewidDisplay_Desc_Key to the viewid you copied in the previous step.

- See the picture below to match if everything is right and make sure that you set the control to be visible WEB.

You should be happy to know that you are almost done; just Publish the changes and Voila!
Make sure you test the control, Refresh the Dynamics 365 App and you will be able to see your New multi-select lookup. Try it out and make sure to select more than one account for that. You can see the images below to match your page:

I hope this article was helpful to you. Happy CRMing!


