
Power Apps Portals are a significant part of the organization in terms of long-range strategy. These portals enable organizations to interact with external-facing websites with data from Microsoft Dynamics 365. Recently, Microsoft enriches the portals Dynamics 365 with Power BI Embedded Service allowing customization which allows access to the Power BI Service component (reports, dashboards, and tiles) to external users who do not possess a Power BI account or license.
This blog is the ultimate guide to help you understand how you can embed Power BI visualization in Microsoft Dynamics 365 Portal’s Web page.
Prerequisite:
To access Power BI Apps, you need to have Dynamics 365 for Customer Service organization and a Global Admin user with Dynamics 365 and Power BI Licenses. Moreover, to proceed further you also need to have a provisioned Dynamics 365 License; if you do not have it then go to Power Apps Admin Center and select the environment to access portal setup and provision a portal on any of the given templates according to your requirements.

Steps for Power BI Dashboard and Portal Integration
Once you are done with the completion of Portal Provision and your Portal is up and running then follow the steps below to surface a Power bi on Portal’s website.
Enable Power BI Visualization from Power Apps Portal
- Open the Power App and go to the environment where you provisioned the Portal
- Next, go to the Your Apps in Power Apps Homepage and locate Your Portal
- Choose more commands and press Settings

Next, in the Opened Portal Setting Window, Press Administration

- You will now see that the Power Apps Portal has opened in a separate tab
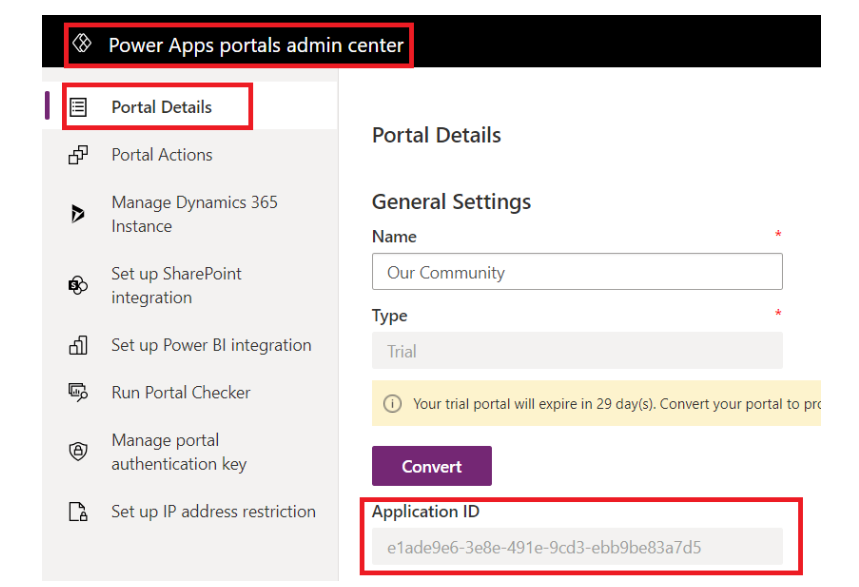
- Note the App ID and Portal Details Page as you will need them for later steps
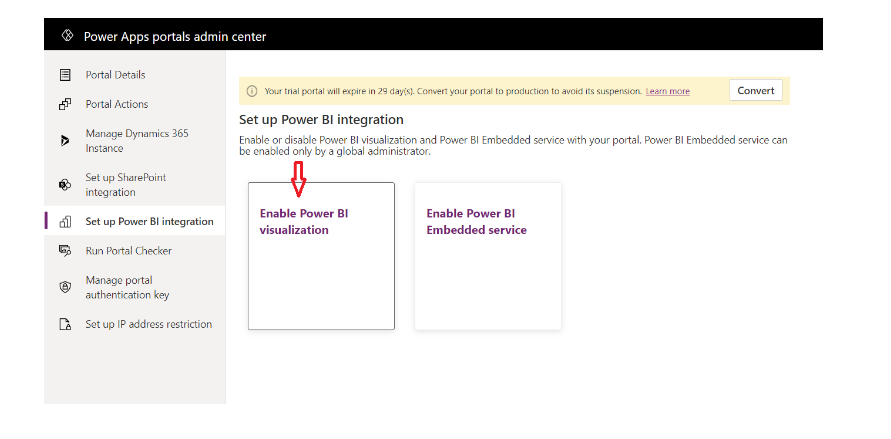
- In the Power, Apps Portal choose Set Up BI Integration and press Enable BI Visualisation
- Once you see the confirmation pop-up press Enable
Create an Azure AD security Group and Add it to the Power BI Account
- To display reports and dashboard built-in Power BI workspaces on Portal’s webpage create a security group in Azure Active Directly
- Next, you need to add Portal Application being a member of this group
- Then take the group to the Power BI account from the admin Portal
- Open Azure Portal and Sign in using your Global Admin account
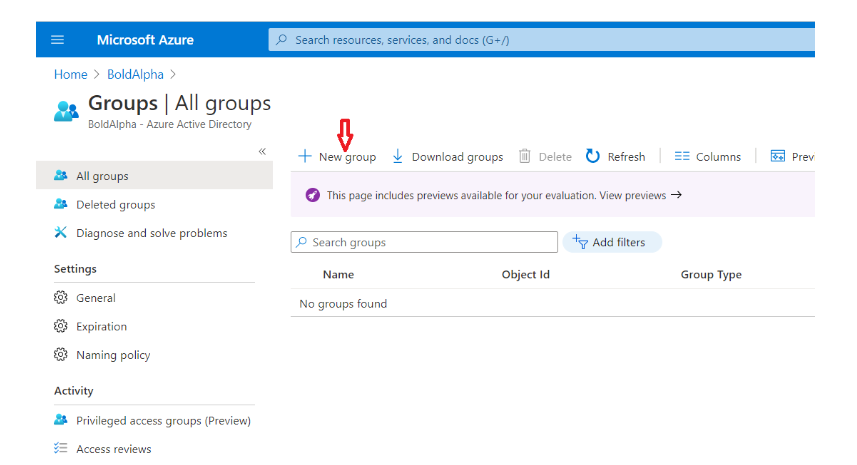
- In the left Pane go to Azure Active Directory Select Groups and then press New Group
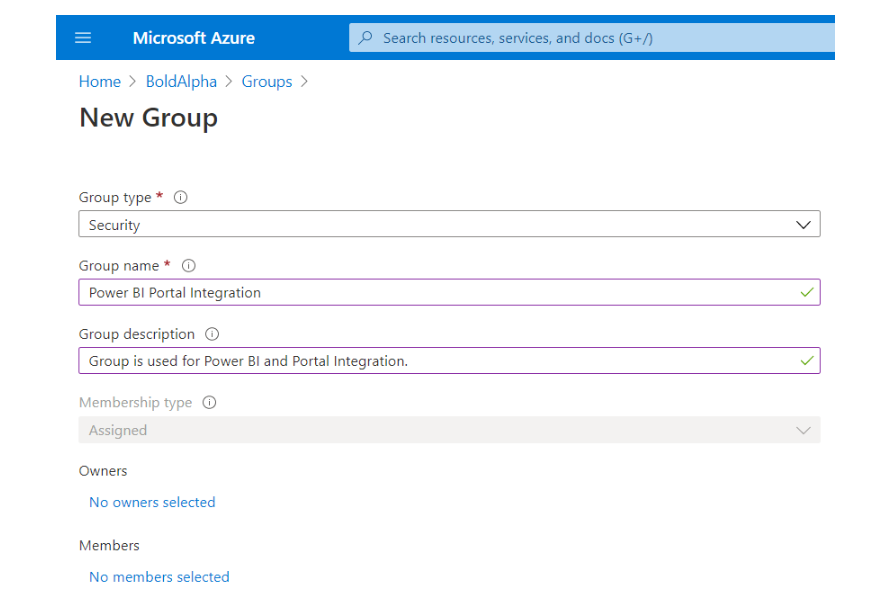
- Once you open the New Group Page, select Security and enter a group name
- Click Create
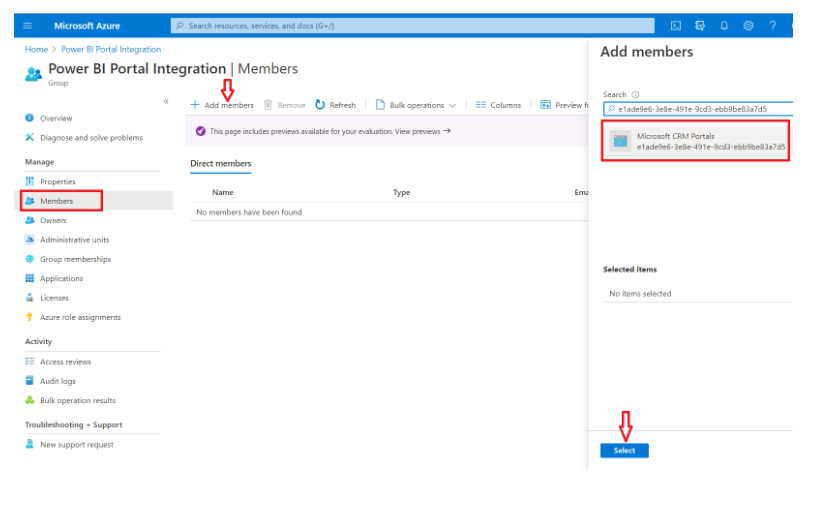
- Open the created Group and go to Manage > Members > Add Members
- Specify Portal App ID you noted earlier and put it in Add member search box
- Click Select
- Now you need to add this security group to the Power BI Service
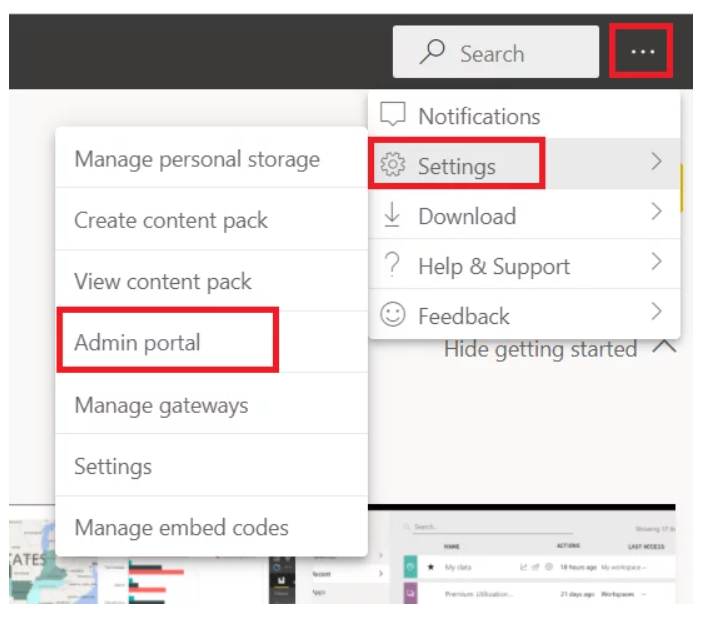
- Go to Power BI and use Global Admin User Sign in
- On the right choose settings and go to Admin Portal
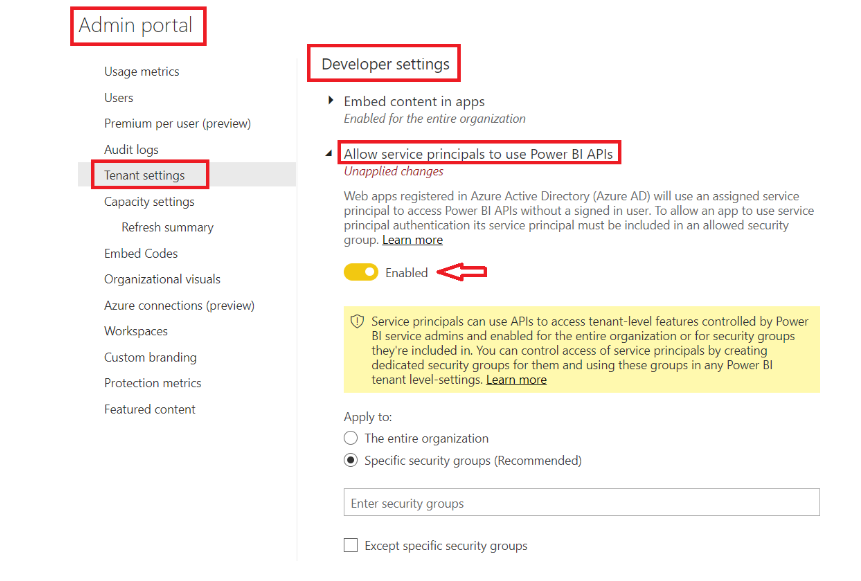
- Next, from the Admin Portal go to Tenant Setting
- Find Developer Setting> expand Allow Service Principals to Use BI APIs Section
- Using Radio Button Enable it
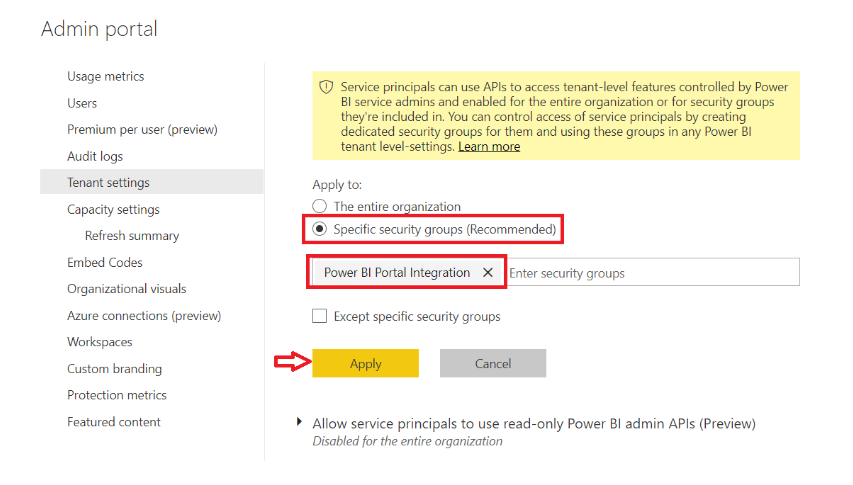
- Choose Specific Security Groups and search for your group
- Select group and Choose Apply
HOW TO CREATE POWER BI WORKSPACE AND PUBLISH YOUR REPORT
- This step will allow you to create a workspace in Power BI and publish it to a new or existing report.
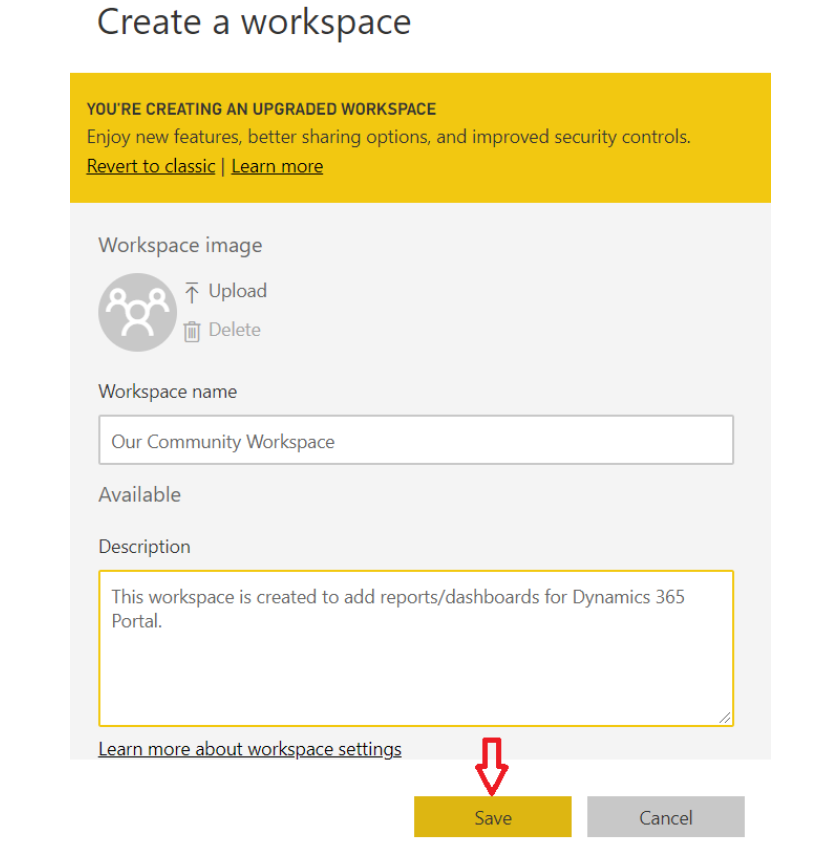
- Move to Power BI Admin Center by selecting Global Admin user
- Create a Workspace
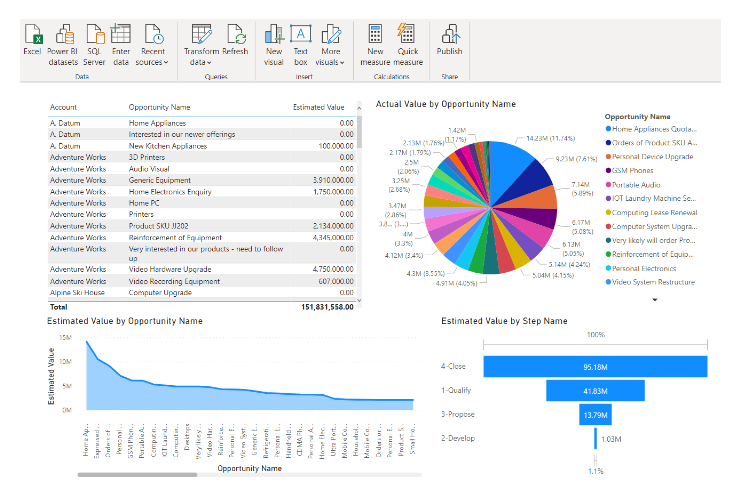
- Go to the Power BI Desktop application
- Create New Report and or open the existing report that you want to be displayed on your portal
You can see the sample below for your understanding
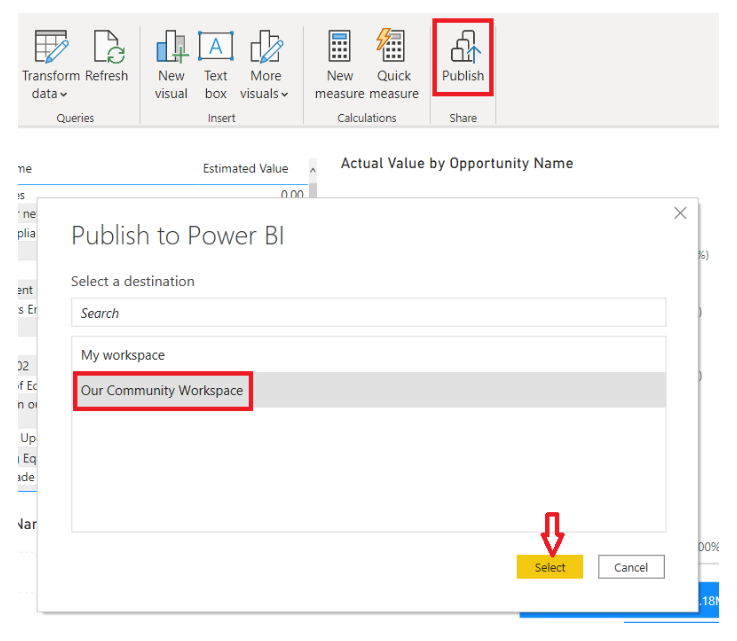
- Choose the Publish Command from the Toolbar section
- Select the created workspace or any other one of your choice
- You will see a success message when the report is successfully published
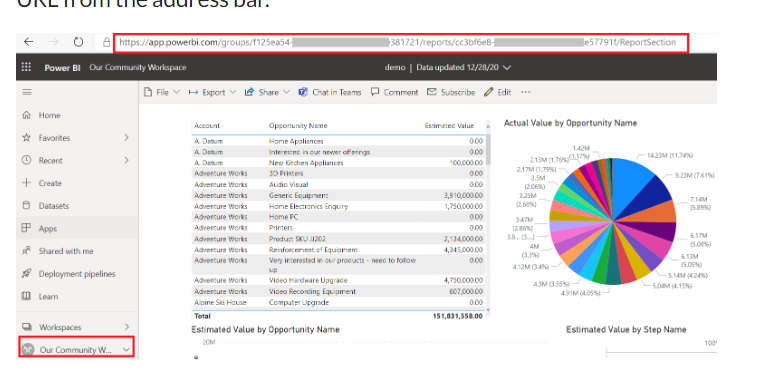
Now go back to your workspace and open the report you published and copy the report URL
Enable Power BI Embedded Service from Portal Admin
This step will allow you to select the Power BI workspace which will enable surface reports/dashboards on Portal’s webpage
- Scroll back to Power Portal Admin Center
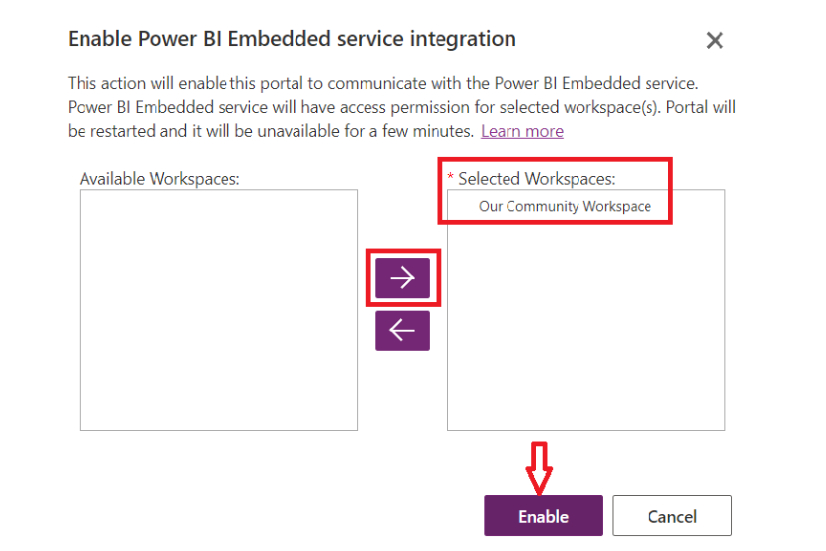
- Choose Set up Power BI integration > Enable Power BI Embedded Service

- Next Select Power BI Workspaces you want to use and choose the Selected workspaces column and then Choose Enable
- You will see a confirmation message once the embedded service has been enabled successfully
Embed Power BI Dashboard/Report to Portal Webpage
- The final step is to embed the Power BI report/dashboard to Portal’s webpage with powerbiliquid tag
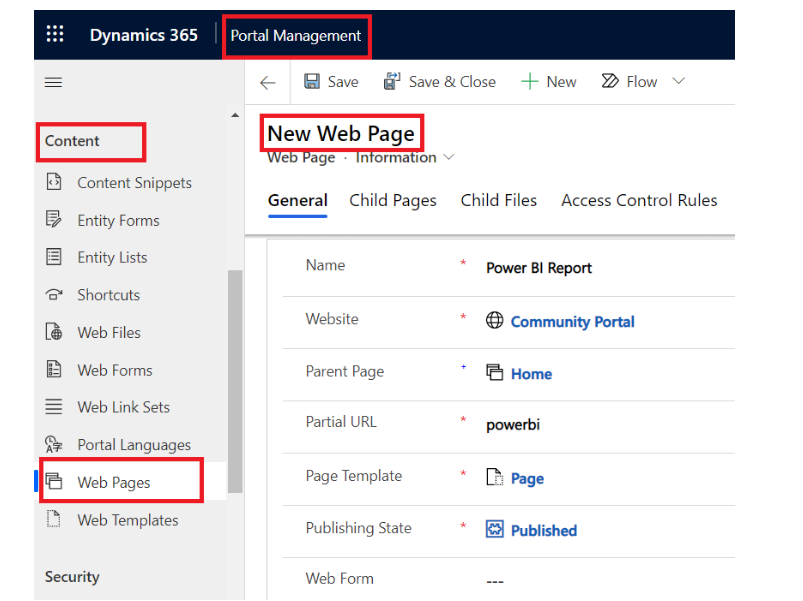
- Choose Power Apps > Power Apps Homepage > Choose Portal Management

- You will see Portal Management App is opened
- Choose Web Pages from the Content Section
- Add a New Web Page
- Choose the Template, URL, and parent page of your Choice
- Click Save
- Open the Content Page from the Localized Content subgrid > Copy (HTML) and add powerbi liquid tag as shown. Make sure to use authentication type as powerbiembedded for report or dashboard in workspaces
- Paste the report URL you noted earlier in the path parameter
Power BI tag: {% powerbi authentication_type:”powerbiembedded” path:”Your report URL” %}

- The last step is to add the web page to Portal Web Link set if needed and brose to Portal in the new tab
- Go to the Power BI web page
- You will then see that the Power BI report is displayed there without needing any authentication/sign in

Congratulations!!! You have integrated the Power BI report/dashboard into the Power Apps Portal’s Webpage.


