
Have you ever felt the need to configure a multiselect lookup? As I was working on a Dynamics 365 implementation, it was requested of me to make a dropdown that possessed the features listed below.
Consumer Specific Requirements
- A consumer should be able to opt for more than one option from the dropdown
- The dropdown displays more than 100 items
- A consumer should be able to surf for other options
- Options should be arranged in alphabetical order
When you go through these points, you may believe that this could be available with a standard Choices (multi-select) column, but it’s not the case in every matter.
Especially, when it comes to the ability for a consumer to manage the list of items which would require the user(s) to gain access to the PowerApps maker.
Study the requirements
The perfect solution would require a lookup column from which a user can select more than one option. Let’s study the requirements one by one:
- A user should be able to opt for more than one option from the dropdown.
- They don’t normally provide multiple select options
- The dropdown would have an excess of 100 options
- With a lot of items to choose from, a lookup would be the ideal solution.
- A consumer should be able to add extra items to the options without the need to use a developer
- If a user wants to gain access to updating an items column, they would need access to the PowerApps maker environment, which is not a preferable option.
- A consumer should be able to browse the items list
- Search and filtering are only available with lookups further confirming that lookups would be the preferred approach.
- Items should be listed alphabetically
- The hard fact is once the list of items is created it cannot be altered.
But no need to worry, there is a built-in component that is designed with Dynamics 365 Field Service that allows system administrators to configure a multi-select lookup.
The setup is rather simple and does not require any code. I will explain step-by-step how to configure the lookup.
How to configure multi-select lookup
Follow these 12 easy steps one by one to configure a multi-select lookup
- Log on to the PowerApps Maker
- Confirm that you have chosen the right environment that has Dynamics 365 Installed.
- Choose Data on your navigation, the opt for the Tables options
- Choose the Contacttable
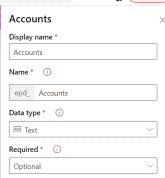
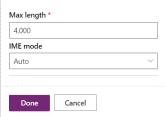
- Establish another column called Accounts and make it sure to arrange the properties according to the images on the right. Click on the save button once you have ticked all the above boxes.
Display name: Accounts, Data Type: Text, Advanced settings – Max Characters: 4000
- Now add in the Accounts column into the Contact Main Form, then choose the Save buttonand click Publish.
Choose the image below to preview a sample.
- Now, you need the option of the multi-select control to add in the form. When I was writing the article, this option didn’t exist in the modern maker experience, so you will need to convert to the option by clicking on Switch to Classic.
Look for the image below to preview the sample

- Choose on the Accountscolumn and the field properties option will open up, then choose the controls tab.
Click on the image on the below to open up a sample
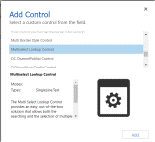
- Now choose the Add Control option, the skim down and find the Multiselect Lookup Control option, click it, and then choose the Add button
Click the image on the below to preview a sample
- If you need to configure the control, you will require the view ID for Active accounts. To achieve this:
- Open a new window tab and add a new session of the PowerAppsmaker.
- Select the right environment.
- Select one of the Dynamics 365 apps
- Click on Accounts on your tab.
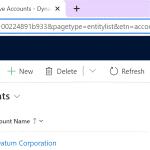
You need to make sure you have set the view to Active Accounts. Finally, copy the view id from the URL area and save it.
Select the picture below to open up a sample
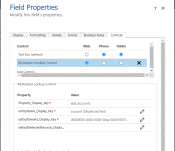
- Now, you can configure the properties for the control:
- Click default, the Property_Display_Keyshould already pop in.
- Choose on the pencil button next to entity Name_Display_Key
- Click on the Bind to Static Value and then adjust the Single Line.
- Text property to account (in all lower case).
- Finally, choose the viewidDisplay_Desc_Key to the preview id you copied in the previous step.
Select the image on the below to open a sample.
- Lastly, ensure that the settings look the same. View id will most likely be different. Make sure that you set the control to be visible to the Web. Click on OK and the dialog box will close then.
Now all that is left is to publish and save the changes. But before you save, you need to refresh the browser, otherwise your changes will be undone.
This is because you made the changes on different browsers. You can view it in the PowerApps marker.
Finally, time to test for control. After refreshing the Dynamics 365 App, your new multi-select lookup will be displayed. See the images below as samples.

This is exactly how multiple accounts will show.

Final Take
That’s all folks. By following this comprehensive step by step guide, you will be able to configure a multi-select lookup very easily. I hope this was helpful. Until next time.

