About the Author: Manish Luhana
In Azure Functions, how to use dependency injection for code reuse and clarity, employ dependency injection.
Throughout your classes when building an application, you’ll use several services and tools. Some of them have complicated constructors, while others are interdependent. You can make it easier for classes to obtain an instance of a service and utilize it without having to instantiate it by utilizing dependency injection (opens new window). This improves the readability of your code and makes it easier to reuse services.
The dependency injection pattern may be used in.NET Azure Functions (opens new window). We’ll look at how it works in this post.
Requirements
You’ll need the following factors to follow along:
- A Microsoft Azure membership (if you don’t already have one, sign up for a free account (opens new window) before you start)
- Visual Studio (opens a new window) or VS Code (opens a new window) (opens new window)
- Make that the Azure workload is turned on in Visual Studio.
In.NET, use the dependency injection pattern. Azure Functions is a service provided by Microsoft.
We’ll begin by using Visual Studio to create an Azure Function. If you want, you may do this with Visual Studio Code. The dependency injection pattern may be used in.NET Azure Functions (opens new window). We’ll look at how it works in this post.
1. Create a new project with Visual Studio.
2. As the project template, select Azure Functions.
3. Assign a name to the project.
4. Select Http trigger from the Create Next menu, and leave the rest of the parameters alone.
5. Finally, click Create to start working on your project.

(In Visual Studio, create an Azure Functions project.)
We’ll add some files to the Azure Functions project to show dependency injection. An interface, a service that implements the interface, and a Startup class that configures dependency injection are all included.
1. Copy and paste the code below into a new file called ITipsService.cs.
public interface ITipService { string GetTip(); }
2. After that, make a TipService.cs file. In the file, paste the following code. This is where the ITipService is implemented. For a random tip, the GetTip function delivers an Azure Tips and Tricks URL (opens new window).
public class TipService : ITipService { public string GetTip() { Random tipNumber = new Random(); return “https://microsoft.github.io/AzureTipsAndTricks/blog/tip” + tipNumber.Next(1, 335) + “.html”; } }
3. Finally, make a new file called Startup.cs. Replace references to the namespace “FunctionApp1” with the namespace of your Function App when pasting the following code into it. This code adds the HttpClient and TipsService services to the app. We may utilize them using dependency injection throughout the remainder of the programme by declaring them here. There can only be one class that derives from FunctionsStartup in the Function App.
using Microsoft.Azure.Functions.Extensions.DependencyInjection; using Microsoft.Extensions.DependencyInjection; [assembly: FunctionsStartup(typeof(FunctionApp1.Startup))] namespace FunctionApp1
{ public class Startup : FunctionsStartup { public override void Configure(IFunctionsHostBuilder builder) { builder.Services.AddHttpClient(); builder.Services.AddSingleton((s) => { return new TipService(); }); } } }
The project should now appear as follows:
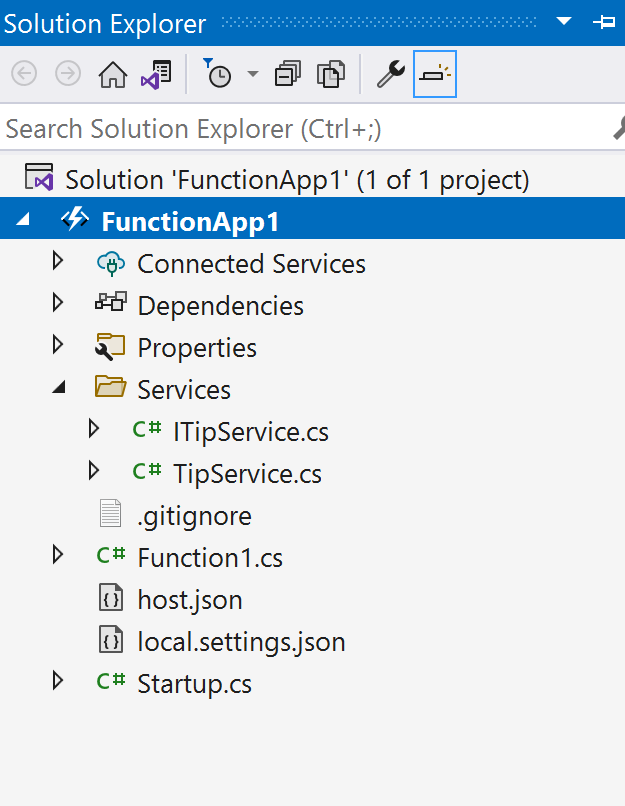
(In Visual Studio, the Azure Function project)
4. Types from NuGet packages that you must install are included in the startup class. Manage NuGet packages by right-clicking the project file and selecting Manage NuGet packages.
5. Install Microsoft.Azure.Functions.Extensions by going to Browse Search and looking for Microsoft.Azure.Functions.Extensions.
6. Apply the same procedure to Microsoft.Extensions.Http
7. Next, alter the code in the Function class to the following:
using Microsoft.AspNetCore.Http; using Microsoft.AspNetCore.Mvc; using Microsoft.Azure.WebJobs; using Microsoft.Azure.WebJobs.Extensions.Http; using Microsoft.Extensions.Logging; using System.Net.Http; using System.Threading.Tasks; namespace FunctionApp1 { public class Function1 { private readonly HttpClient _client; private readonly ITipService _service; public Function1(IHttpClientFactory httpClientFactory, ITipService service) { this._client = httpClientFactory.CreateClient(); this._service = service; } [FunctionName(“Function1”)] public async Task Run( [HttpTrigger(AuthorizationLevel.Function, “get”, “post”, Route = null)] HttpRequest req, ILogger log) { var url = _service.GetTip();
var response = await _client.GetAsync(url); if (response.StatusCode == System.Net.HttpStatusCode.OK) { return new RedirectResult(url); } else { return new NotFoundResult(); } } } }
This code injects an IHttpClientFactory and an ITipService into an IHttpClientFactory using a function Object () {[native code]}. These have been completely instantiated and are ready to use. That’s where dependency injection shines. The TipService is then used. To get the URL of an Azure Tips & Tricks post, use the GetTip function. The HttpClient is then used to obtain the URL’s webpage. If it exists, it will issue a redirect request to that website, which will redirect the browser to the Azure Tips & Tricks article.
8. Execute the Procedure
9. When the Function is activated, it displays the Function URL, which you may use to activate it. Copy the URL and paste it into your browser’s address bar.
10. You’ll be sent to an article on the Azure Tips & Tricks website.

(The function takes you to a post on Azure Tips & Tricks.)
Summary
Dependency injection (opens new window) is a software development strategy that simplifies the reading and reuse of code. It may be used in.NET Azure Functions (opens new window) by creating a Startup class that calls the FunctionsStartup class. Take a look at it!